This week we worked with Sean McCormick (seanmccormickphoto.com) on using flash units aka speedlights. Speedlights are light and extremely portable sources of light. The thing that surprised me about speedlights are the modifiers available for them. We had grids, soft boxes and beauty dishes for the speedlighting class. An advantage of using speedlights is the ability to use a higher shutter speeds to capture high speed action shots. Most speedlights also have the ability to pop multiple times during a long exposure which creates a neat little sequential shot like my second shot.
Friday, April 30, 2010
Friday, April 23, 2010
Interior and Architecture Photography
Thomas Arledge (www.thomasarledge.com) lead us through interior and architectural photography. The majority of the time was spent on lighting and shooting interiors. It was great to be able to travel to different locations and shoot them. Here are a few shots that I took from our 3 locations.
 Brightwood Bistro (www.brightwoodbistro.net) was gracious enough to open up their doors early and let us shoot their interior. I had to use HDR to get this image because of the strong sunlight coming through the windows.
 We also had the opportunity to shoot at Courtland Towers (www.dittmarcompany.com/our-communities/courtland-towers), a beautiful luxury apartment complex. I also used HDR because of the windows were much brighter than the interior.
 Brightwood Bistro (www.brightwoodbistro.net) was gracious enough to open up their doors early and let us shoot their interior. I had to use HDR to get this image because of the strong sunlight coming through the windows.
 We also had the opportunity to shoot at Courtland Towers (www.dittmarcompany.com/our-communities/courtland-towers), a beautiful luxury apartment complex. I also used HDR because of the windows were much brighter than the interior.
Friday, April 16, 2010
Studio Portraiture
This week we Michael Cunningham came back to instruct us on studio portraiture. In this module we learned how to light using 4 classic lighting techniques; side, rembrandt, loop and butterfly. We also learned about high key and low key backgrounds, broad and short lighting and lighting ratios. Here are a few examples that I shot.
Friday, April 9, 2010
Integrating Photoshop into the Creative Studio
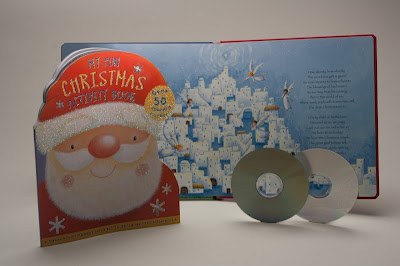
This week we worked on the module Integrating Photoshop into the Creative Studio with Tina Williams (www.tinaphoto.com). Throughout the module we focused on lighting and shooting different parts of an image and then bringing them all together in Photoshop. The key to doing this properly is to make sure nothing but the light moves. Any movement of the set or camera will make it awfully difficult to align the image in Photoshop. This is an example book/CD catalog shoot we did.
Saturday, April 3, 2010
Shooting w/ Sonny
Friday, April 2, 2010
Product and Stills
For this Products and Stills class we had Miami based photographer Sonny Senser (www.sonnyphoto.com) as an instructor. In this class we learned how to control lighting to photograph metallic items, glass and items in mixed lighting. Sonny is a great instructor, he encouraged us to explore everything in the studio and he even brought out the medium format Mamiya for us to take a few shots.
Panoramic Photomerge
In Photoshop you can create panoramic images by stitching several sequential images together. Here you can see six sequential shots that I took of the Kennedy Center along the Potomac. Through Lightroom I selected the six images and merged them together in Photoshop. Photoshop automatically puts them together and blends the lines together . Below is the merged image.
 By cropping the image you get a nice panoramic shot.

 Through Lightroom I selected the six images and merged them together in Photoshop. Photoshop automatically puts them together and blends the lines together . Below is the merged image.
 By cropping the image you get a nice panoramic shot.
Labels:
panoramic,
photomerge,
Photoshop 3
Subscribe to:
Posts (Atom)


